Network and Tunneling
|
Nov 25, 2013

前言
隨著雲端網路的時代到來,
隨用隨租的運作模式已徹底改變大眾對於數位服務的觀念,
以一個現代的資料中心來說;
會有上萬台的實體機器(Physical Machine)、虛擬主機(Virtual Machine 以下簡稱 VM),
並必須支援不同網路頻寬的需求,在現在網路架構中如何動態的網路配置變得相當重要。
如同一使用者所建 VM 若跨不同的 Physical Machine,
則需要在 Physical Machine 間配置 Virtual Network;
以及不同使用者的 Physical Machine 之間需要區隔不同的 subnet 等,
為此 Virtual Network 技術漸獲重視。
傳統的作法,基本上還是以 802.1Q Virtual Local Area Network(VLAN) 來區分不同的使用者,
但是會產生以下 3 點問題:
- VLAN 的識別碼僅 12 位元僅能區隔最多 4094 個用戶,無法因應大量需求。
- Layer 2 switch 所使用的 Spanning Tree Protocol(STP) 也讓可用頻寬受限,無法發揮網路最大的使用率。
- 同時數量龐大的 VM 也將會造成 Top of Rack Switch (ToR)過量的負荷。
因此既有的 VLAN 方案無法滿足雲端環境所需要的 virtual network 需求,
有鑑於此,VM 透過 virtual switch 間的 tunnel 建立連線成為快速解決的途徑,
相關設定均在 server 端即可完成,底層網路僅為傳遞封包通透使用,無需額外設定。
Tunneling Protocol
Wiki 上的訂義為:
是一個網路協議的載體。使用隧道的原因是在不兼容的網路上傳輸數據,或在不安全網路上提供一個安全路徑。
穿隧協議可能使用數據加密來傳送不安全的負載協議。
也就是說 Tunnel 會把下層(例如 layer3)的 packet 包裝到上一層(例如 layer4),
以 SSH Tunneling 來說,就是將 IPv4 的封包,包裝到上一層 SSH protocol 中進行傳輸,
從而實現際體網路間的穿透。
很明顯的,
實現的前提就是 sender、receiver 都要有一種能夠解析這種 pakcet 的 kernel module 或是設備才行。
常見的 Tunneling 技術有:
1. IP in IP
其實說穿了就是把 IP layer(layer 3) 的 packet 再包一層 IP 的 packet,
看似好像沒什麼學問,也浪費。
但是其實不然,
它的作用其實等於實現一個 layer2 的 bridge,
我們都知道 MAC 是在 layer2 的,根本不需要 IP,
但是 IP in IP 是透過兩端的 router(switch) 串成的一個 Tunnel,
可以把遠端的兩個 virtaul private network 串連。
也可用來當作 IPv6 over IPv4 的 tuneling。
2. Generic Routing Encapsulation(GRE)
和 IP in IP 類似,只是功能更強了一些,還支援 broadcast。
新一代的 Tunneling 技術有以下的優點
- Ability to manage overlapping addresses between multiple tenants
- Decoupling of the virtual topology provided by the tunnels from the physical topology of the network
- Support for virtual machine mobility independent of the physical network
- Support for essentially unlimited numbers of virtual networks (in contrast to VLANs, for example)
- Decoupling of the network service provided to servers from the technology used in the physical network (e.g. providing an L2 service over an L3 fabric)
- Isolating the physical network from the addressing of the virtual networks, thus avoiding issues such as MAC table size in physical switches.
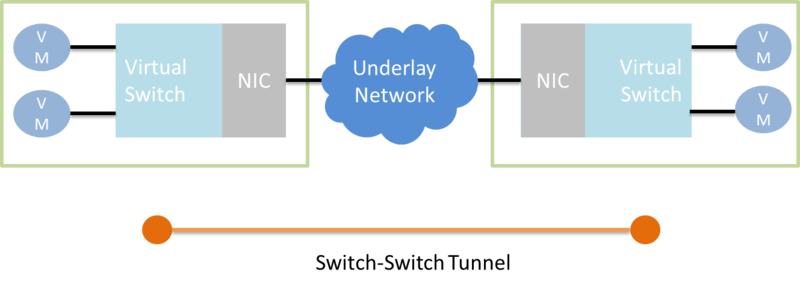
Switch-Switch Tunnel 架構 下來我們要介紹的 tunnel 技術 VXLAN、NVGRE、STT 都屬於 Switch-Switch Tunnel 的架構, 好處就是 VM 與 VM 溝通時,是不會知道傳輸的路徑中間如何連接的, 使系統管理者只需專注在中間這層的 Tunnel End Point 如何設定就行了。

接下來會一一依介紹幾個的 tunneling 技術
- Generic Routing Encapsulation(GRE)
- Virtual eXtensible Local Area Network(VXLAN)
- Network Virtualization using Generic Routing Encapsulation(NVGRE)
- Stateless Transport Tunneling Protocol[STT]
Ref.
- Wiki - Tunneling Protocol
- Wiki - IP in IP
- Wiki - IP Tunnel
- Wiki - Generic Routing Encapsulation
Log
|
Nov 4, 2013
現實生活中,有可能伺服器會遭到駭客的攻擊
而大部分的駭客都會把存在系統上的 history 記錄清掉
讓你搞不清楚他做了些什麼
這篇文章主要要記錄,如何透過 syslog 可以備份本地端的 history 到 遠端的 syslog server
1.下載 bash
$ wget http://ftp.gnu.org/gnu/bash/bash-4.2.tar.gz
$ tar zxvf bash-4.2.tar.gz -C /usr/local/bash-4.2
$ cd /usr/local/bash-4.2
2.修改 bashhist.c 內的 bashsysloghistory function 約在 708 行
去掉 bash-4.2/config-top.h 中的 define SYSLOG_HISTORY 的注釋
#if defined (SYSLOG_HISTORY)
#define SYSLOG_MAXLEN 600

void
bash_syslog_history (line)
     const char *line;
{
  char trunc[SYSLOG_MAXLEN];
  char vmip[20];

  get_local_ip(&vmip);

  if (strlen(line) < SYSLOG_MAXLEN)
    syslog (SYSLOG_FACILITY|SYSLOG_LEVEL, "HISTORY: VMIP=%s PID=%d PPID=%d SID=%d User=%s CMD=%s", vmip, getpid(), getppid(), getsid(getpid()), current_user.user_name, line);
  else
    {
      strncpy (trunc, line, SYSLOG_MAXLEN);
      trunc[SYSLOG_MAXLEN - 1] = '\0';
      syslog (SYSLOG_FACILITY|SYSLOG_LEVEL, "HISTORY (TRUNCATED): VMIP=%s PID=%d PPID=%d SID=%d User=%s CMD=%s", vmip, getpid(), getppid(), getsid(getpid()), current_user.user_name, trunc);
    }
}
#endif
3.編譯安裝
$ ./configure
$ make
$ make install
4.把 User 的 bash 換成現在安裝的 bash4.1
這樣 log 就會記錄在 /var/log/syslog
$ vim /etc/passwd

    dongwm:x:501:501::/home/dongwm:/usr/local/bash_4.1/bin/bash
5.syslog server 配置(加入 syslog server 的位址)
$ vim /etc/rsyslog.conf

    .  @your.syslog.server.ip
Ref.
- http://www.zdh1909.com/html/linux/17097.html
- http://ftp.gnu.org/gnu/bash/
Network and NetFPGA
|
Jun 3, 2013
Install NetFPGA
$ yum check-update
$ rpm -Uhv http://netfpga.org/yum/el5/RPMS/noarch/netfpga-repo-1-1_CentOS5.noarch.rpm
$ yum install netfpga-base
$ /usr/local/netfpga/scripts/user_account_setup/user_account_setup.pl
$ reboot
$ cd ~/netfpga/
$ make
$ make install
$ reboot
$ lsmod | grep nf2
$ ifconfig -a | grep nf2
Install PRMForge for required packages
$ wget http://apt.sw.be/redhat/el5/en/i386/rpmforge/RPMS/rpmforge-release-0.3.6-1.el5.rf.i386.rpm
$ sudo rpm --import http://apt.sw.be/RPM-GPG-KEY.dag.txt
$ sudo rpm -Uhv rpmforge-release-0.3.6-1.el5.rf.i386.rpm
Install OpenFlow
$ yum -y install git automake pkgconfig libtool gcc
$ wget http://ftp.gnu.org/gnu/autoconf/autoconf-2.69.tar.gz
$ tar xvzf autoconf-2.69.tar.gz
$ cd autoconf-2.69
$ ./configure --prefix=/usr
$ make
$ make install
$ cd
$ git clone git://openflow.org/openflow.git
$ cd openflow
$ git checkout -b 1.0.0-netfpga origin/devel/tyabe/1.0.0-netfpga
$ ./boot.sh
$ cd (your openflow directory)
$ ./configure --enable-hw-lib=nf2
$ make
$ make install
ofstartscdemo.sh
#!/bin/bash
dpid=90e6babbf72f #12 digit in Hex; Usually use OF SW's MAC address
controller_ip=140.116.164.180
ofdatapath punix:/var/run/dp0 -D -d $dpid -i nf2c0,nf2c1,nf2c2,nf2c3
sleep 5
ofprotocol unix:/var/run/dp0 tcp:$controller_ip --out-of-band -v  &
exit 1
of_stop.sh
#!/bin/bash
killall ofprotocol
killall ofdatapath
Start
$ chmod +x of_start_scdemo.sh
$ chmod +x of_stop.sh
$ ./of_start_scdemo.sh
Ref.
- OpenFlow.org
Log
|
Apr 20, 2013
Install Package
[root@server2 ~]$ yum install php php-mysql mysql mysql-server mysql-devel
setting iptables
[root@server2 ~]$ vim /etc/sysconfig/iptables
-A RH-Firewall-1-INPUT -p udp -m udp --dport 514 -j ACCEPT
-A RH-Firewall-1-INPUT -p tcp -m tcp --dport 514 -j ACCEPT
[root@server2 ~]$ ln -s /usr/lib64/mysql/ /usr/local/lib/mysql
[root@server2 ~]$ ln -s /usr/include/mysql/ /usr/local/include/
[root@server2 ~]$ cd /usr/local/src/software/sqlsyslogd
download syslogd packge
[root@server2 software]$ wget -d -r -np http://www.frasunek.com/sources/security/sqlsyslogd/
[root@server2 software]$ cd www.frasunek.com/sources/security/sqlsyslogd/
[root@server2 sqlsyslogd]$ rm -rf index.html*
[root@server2 sqlsyslogd]$ cd contrib/
[root@server2 contrib]$ rm -rf index.html*
[root@server2 contrib]$ cd
[root@server2 ~]$ mv/usr/local/src/software/www.frasunek.com/sources/security/sqlsyslogd/ /usr/
local/src/software/
make syslog package
[root@server2 ~]$ cd /usr/local/src/software/sqlsyslogd/
[root@server2 sqlsyslogd]$ make
cc -O6 -Wall -pipe -I/usr/local/include-DCONF=\"/usr/local/etc/sqlsyslogd.conf\" -L/usr/local/lib/mysql-lmysqlclient sqlsyslogd.c   -o sqlsyslogd
[root@server2 sqlsyslogd]$ cp sqlsyslogd /usr/local/sbin/
exec syslog
[root@server2 sqlsyslogd]$ sqlsyslogd
usage: sqlsyslogd [-h hostname] <-u username> [-p] <-t table>[database]
修改 /etc/ld.so.conf,並使其生效,這個文件維護著編譯動態連接函式庫的位置
[root@server2sqlsyslogd]$ vim /etc/ld.so.conf
include ld.so.conf.d/*.conf
/usr/local/lib/mysql
[root@server2 sqlsyslogd]$ ldconfig
在 mysql 中,創建相對應的資料表
mysql> create database syslog;
Query OK, 1 row affected (0.00 sec)

mysql> use syslog
Database changed
mysql> create table logs (Id int(10) NOT NULL auto_increment,Timestampvarchar(16),Host varchar(50),Prog varchar(50),Mesg text,PRIMARY KEY (id));
Query OK, 0 rows affected (0.01 sec)

mysql> exit
Bye
該文件定義,mysql 的密碼
[root@server2sqlsyslogd]$ cat /usr/local/etc/sqlsyslogd.conf
123456
在 syslog-ng.conf 增加下列這幾行
[root@server2sqlsyslogd]$ vim /usr/local/syslog-ng/etc/syslog-ng.conf

destination sqlsyslogd{
 program("/usr/local/sbin/sqlsyslogd -u root -t logs syslog -p");
};

log {
        source(s_remote);
        destination(sqlsyslogd);
};
[root@server2 sqlsyslogd]$ /etc/init.d/syslog-ng restart
Stopping KernelLogger:                                   [ OK ]
Starting KernelLogger:                                   [ OK ]
Log
|
Apr 20, 2013
- centos in /etc/syslog.conf end insert
- ubuntu in /etc/rsyslog.conf end insert
setting '/etc/syslong.conf
[root@client ~]$ vim /etc/syslog.conf
*.*   @server_ip
use logger testing
[root@client ~]$ logger -i just one test
[root@client ~]$ tail -1 /var/log/messages
Jan 27 22:12:02 client rot[2861]: just one test
check syslog-ng server
[root@server2 ~]$ cat /var/log/syslog-ng/20100128/ <server ip> /messages
Jan 28 04:24:32 <server ip> root[2861]: just one test

